Sunday, September 2, 2012

Daily Five Anchor Charts


Daily Five: Anchor Charts

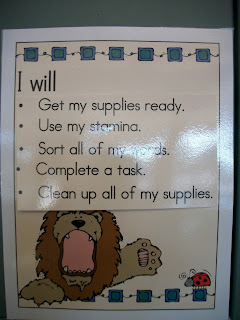
I made these anchor charts for the Daily Five.  I designed them so that the kids will still brainstorm the list, but it will magically be typed up and pretty.  And I will be able to put a mini anchor chart by the materials that they use. 


My use The Daily Five is not exactly what the authors (Gail Boushey and her sister Joan Moser) described in their book.  I have taken their AMAZING ideas and modified them to fit my classroom and the expectations that are in place from my school district.  (For example, we use a basal reading program. Automatically that makes it incredibly difficult to fully implement The Daily Five and teach the basal with fidelity.)

I will go through all of the ways I use D5 throughout the year.  The one part that is significantly important, however, is the training piece.  If you have not read their book, it is literally the BEST teacher book I have ever read.  Your students will learn to be independent and gain confidence in reading and writing.  (Last year was my first year to implement the Daily Five and our librarian was AMAZED by my students’ ability to read independently, without exception. Frankly, I was amazed, too, because they were a squirrely class!  On the last day of school she even came by to thank them and give them a special treat because they were the BEST class she’d had in 15 years in the profession!) 
 
Seriously, read the book. You won't regret it. http://www.amazon.com/The-Daily-Five-Gail-Boushey/dp/1571104291 
 
Here are the anchor charts up close:


Birthday Confession...


Okay, confession time.  I am good at many things… remembering and celebrating birthdays is  not one of them. I mark them on the calendar, I plan out half birthdays, I assign a “Star Student” date, and remember to put them in my newsletter.  But I have never been good at giving the children something.  Last summer, during my adventures sucked into the pinterest abyss, I found so many cute ideas for birthdays.  Every time I would think “That is SO cute! But…”

One day I decided that if I had everything made ahead of time, and it was out on display so that the kids helped remind me, maybe I could try it.  So I went back to my pinterest board and found some inspiration.    
I decided to use laffy taffy ropes (instead of giant pixie sticks, or any of the other great treats that are suggested online).  They were a little cheaper (I got them at Sam’s Club) and reading/telling jokes was REALLY motivating to my class last year. (Even my lowest kids would practice reading their laffy taffy wrappers over and over and over so that they could read it to the class.)

I started with some clipart.  I found a balloon and then used one of my DJ Inkers fonts to write “Happy Birthday!”.  I decided to print the words in different colors (instead of the balloons in different colors) because it was easier to read and used less color ink.   I backed it with a matching color of cardstock and taped them onto the taffy ropes.
To create the display jar, I used the container the taffy came in.  I printed a sign “Happy Birthday!” and taped it in.  It was really that easy.

I added a little tissue paper in the bottom so that the ropes could stick out above the rim. 

 I think I will keep a list of my class on the back of the container so I can put a check when they get theirs.  I don’t want to miss anyone!
I love the way it turned out! I am so excited to use this in my classroom this year!!  

Star Student Week:

Here’s the letter that goes home with my students for their special week!

Dear______________

Mark your calendar!  The week of ______________ is your special time to shine!  Let me tell you all about your special week! Please note: you can choose which activities you would like to participate in.
MONDAY- We would like to get to know you better, so please bring a poster all about you!  This poster can include pictures of you and your family, pets, vacations, and favorite things or you are welcome to write about them. You will introduce your poster on this day. We will look at it all week on our spotlight bulletin board!
TUESDAY- If you would like, you may bring in a special show & tell item to share with the class on this day.
WEDNESDAY- Please bring a favorite book from home and Miss Van Maren will read it to the class! 

THURSDAY- In centers, we will write a letter to you to include in your very own special Star Student book!

FRIDAY- You are welcome to bring a Star Student snack to share with the class! (If your birthday is on a different day during the week, you are welcome to bring it on that day instead.)
We can’t wait to spotlight you and get to know you better! If you have any questions, please let me know!
Congratulations on being Star Student!


Saturday, September 1, 2012

Idea Tools

 
In conjunction with the Daily Five and my Writer’s Workshop, I created a toolbox of “idea tools”.  My students have time to write every day.  Sometimes it is a little challenging to come up with something to write about.  That’s where the Idea Tools come in. 
My students are welcome to use any of these tools to aide in their writing.  There are guidelines for each, and they were introduced and added to the toolbox one at a time.


The container is simply a shower caddy I picked up at WalMart.  (I used it for all of my overhead supplies for a few years-- but when we got document cameras, it was time to repurpose it.)


Stencils are a great tool.  These are some from Dollar Tree. They choose ONE picture, trace it, write about it, color it, and then finish the illustration.   Stencils are great because it is easy to have variety, they are inexpensive, and don’t take up a lot of space.


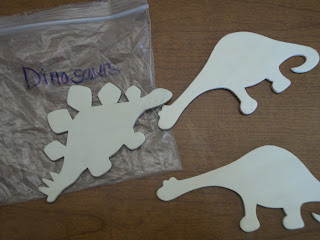
These are similar to the stencils. They are wooden cutouts that you can find at any craft store. I have mine sorted into groups (dinosaurs, transportation, jungle animals, etc.) They trace them write, color, and add to the picture. These are awesome because they are easy for small hands to trace, inexpensive, and extremely durable.   


One last kind of stencil- these are paper stencils. 


I also have a random collection of stickers that I put in.  They take ONE sticker, put it on their paper, and write a story about it.  Then they finish the illustration.  Sticker stories are one of my most-favorite activities for my students.  Their creativity astounds me every year! Anytime I get free stickers (in the mail, from magazine offers, etc.) I throw them in. (Another great time to get stickers is after holiday clearance.)
 
Another thing I put in is self-inking stamps. They change based off the holiday. (What first grader doesn't want to write about Halloween or Valentines Day?)

I found some awesome picture/word banks online. I printed, laminated, and put them out. (I change them randomly.)


My students have journals that they write about their lives, activities, etc. Their journals change- in the Fall, they have one line to write on.  In the Winter, they are half a page of lines, half a page for a picture, and in the Spring they are half a page for picture, and then one and half pages for writing.
They also have a notebook (my class last year named it their “Thought Spot”- because it was their place for writing their thoughts).  If they have a minute during the day, they pull it out and write.  It was unbelievable to me last year how much my students would write- and LOVED to write because they had it as a constant choice.


Behavior Tracking

My philosophy of classroom management is centered on the idea of positive reinforcement and natural consequences.
 
I use many different incentive and reinforcement systems in my classroom.  I work to ensure that I have a whole group, small group, and individual incentives.
Whole Class:
We have a marble jar that we earn marbles for.  When the jar is full, we vote on an incentive.  (Like lunch in the classroom, Miss Van Maren eating lunch in the lunchroom, our principal coming to read us a book, or 5 minutes of extra recess, etc.) Sometimes it is a special “book” (like our money book- something they were going to get to do anyway, but their engagement is even higher when they think they’ve earned it— Shh… don’t tell them!)  We earn marbles for things like hallway behavior, excellent job working quietly during centers, and any time they are with an other teacher (P.E., Library, etc.) they can earn up to 5 marbles (one for every class rule...)
 
 
Groups:
I have found table points are a very effective way to motivate groups.  It’s not a new way to do things, but it’s very effective.  It helps students motivate each other to respond to requests quickly and efficiently.
 
Individuals:
I use class money.  When I first started teaching, I used “super students”- which was just money I designed—little one, five, and ten “dollars” that had frogs to match my theme. 
 
After a few years, I realized that having money that was just like real money would be more beneficial because it would increase their exposure (identifying and counting).  So I made oversized pennies, nickels, dimes and quarters.  I start the year with only pennies, nickels and dimes.  When they earn 5 pennies, they trade in for a nickel, and with 5 more pennies they can trade in for another nickel or a dime.  With their dime, they can shop in the “Wahoo! Box”.  About every other Friday, we have “Wahoo! Day” when they can buy some kind of prize.  (Everything in the box costs the same amount… later in the year, when they have quarters, I have additional items that cost a little bit more that they can choose from).  It may surprise you to know that their FAVORITE things are usually the McDonald’s kids meal toys that I get donated.

(I carry the money around with me... using a binder clip, I clip them to my ID badge.)


Another behavior system that I have in my class is a color-coded clip system.  I was extremely resistant to using a clip or card system because I felt like it broadcasted the poor choices, where I would rather celebrate the good choices that are made.   That was until I had a conversation with my friend Amy who teaches 3rd grade.  She told me that her system had the ability to move up from “on task” to “great day” and that sometimes she would even have the kids put their clip on the very top and call it “outstanding”! 
From that conversation, I made a chart.
I use mini clothespins so that I can use a regular 8.5x11 piece of paper and still fit all of my kids.  (You can find them at Hobby Lobby). 
When the students are on “red” (“Lose a privilege”)- I write a note to let the parents know what’s going on so they can reinforce the expectations at home.  Similarly, if the student is on “purple” (“Outstanding!”) I write a note so that their positive choices can be reinforced and celebrated at home. 
It’s really important that students can redeem themselves.  It should always be an option to work towards moving their clips back up.  (There are obvious exceptions, and you should use your teacher instinct. Just remember, be fair, be consistent.)
 
My students color in their STAR book what color they were on and take it home. Having it documented is really helpful for tracking patterns.   It can also help with filling in the behavior components of the report card.

Friday, August 24, 2012

Back to School Night: Scavenger Hunt Fun!


This is an idea from pinterest... I LOVE how it turned out! It is such an empowering message!

I LOVE Back to School Night.  I love that the kids and families come in SO excited to see their new classrooms.  I love that every parent (whether consciously or subconsciously) asks their child “Are you excited?” and most kids either nod their little heads or say “yes!”.  It is just so nice to have the halls filled with so many happy people! 
My school has tried out many different formats for Back to School Night.  This year, we went with an “open house” format.  Parents went to an opening/welcome session run by the PTA and then were welcome to visit the classrooms to pick up disclosures, scope out the room and ask questions. 
My Kindergarten friend Jen (isn’t it funny how we become the grade we teach?) had a genius idea a few years ago to have the kids do a “scavenger hunt”- that way they could have a reason and a structured opportunity to look around, find things in the classroom (and other important things like the bathroom).
We’ve done this several times since our school opened 4 years ago.  The students (and parents) come in, we hand them the Scavenger Hunt paper and away they go!  It frees you (as the teacher) up to answer questions and just chat casually with the kids and parents.  It also allows the parents and the children to explore together. 


The first year we were at our new school, I included more places around the building-- this is what it looked like:


When they complete it, they bring it back to you for some kind of a treat.  Usually I give out “homework pencils”.  This year, thanks to pinterest, I was feeling a little fancier.  So I made these adorable treat bags!
There are a few Swedish Fish in a bag, with a note that says: “Congratulations! You’re “o-fish-ally” in First Grade!” 

I made one with gold fish crackers for my diabetic student.  I think it's just as fun!


 Their desks are ready with a “Back to School” packet. 

Included in the packet:
       ·         My disclosure
       ·         An “All About Me” form
       ·         A Volunteer Preferences Form
       ·         A confidentiality agreement for volunteers (we have a school policy that 
         everyone that comes in to help out must sign)
       ·         A welcome letter from me
       ·         First Grade Reminders
       ·         A donation envelope
       ·         A pamphlet about why reading to and with your child is CRITICAL.

(I label their packet with their name. First, it allows me to see really fast how many people came.  Second, it helps me make sure everyone gets one (I send them home the first day of school if they did not come to Back to School Night.)

 On the back table, I have a few different signs and pages.
 
First, I have a form for parents to sign in.  Sometimes you don’t get to talk to everyone, so having that list to reference is handy.
Second, I put a volunteer signup sheet.  (I give parents MANY different ways to let me know they are interested in volunteering!)
Third, I put a bus list.  If they know what bus their child rides on, they are encouraged to list it. If they don’t know, we figure it out on the first day of school.
 
 School starts Monday! Are you excited? I sure am!

Tuesday, August 14, 2012

Sight Word Discovery Game

One of my teammates, Jean, has been working all summer to create sight word games… a different game for each week.  (Just as a side note, I am so lucky to have a friend and colleague like Jean. She is so thoughtful and works so hard!  She gives a lot of herself and is willing to do anything she can to help out.  When I say she’s been working all summer to create sight word games- she has been making sets for each of us! What a sweetheart!!)

Okay, back to my story!  Jean has been making these fantastic games.  Meanwhile, I have spent way too much time on pinterest, gathering ideas.  I fell in love with the idea of Discovery Bottles (check out Tunstall’s Teaching Tidbits for more ideas- http://tunstalltimes.blogspot.com/2011/07/discovery-bottles.html ) but I really don’t want to store water bottles.  I wanted something smaller…

Flash forward to Monday.  Jean and I were brainstorming about a game she was working on (that involves Easter eggs). I pulled out some plastic Christmas ornaments out, and was struck with inspiration!
So, here is my version of “Discovery Bottles” a.k.a. “Discovery-Plastic-Christmas-Ornaments-That-I-Found-On-After-Christmas-Clearance”! (Okay, I need a better name-- any ideas?)

They are a little trickier than water bottles because of their design, but I am pretty happy with how they turned out!

(Helpful hint: use another ornament to scoop the rice-- that way you get just the right amount!)

First, I printed and cut out the 5 sight words that I am focusing on.  (Our sight words are broken into sets of 5 words that we focus on each week- and then every few weeks we review all the words we have covered.)
Put a sight word or two in the bottom.


Then I scooped in some rice.  The trick is to make sure that you put it in the side with the raised edge (you know, the part that fits inside when closed.  It makes a BIG difference when gluing it together!).

Stick the other sight words in, have some fun with it! J
Add a little more rice.


Then put a ring of glue around the edge and stick it together.  (This is a little tricky- don’t burn your fingers! Don’t use a high temp glue gun! I learned that lesson the hard way! It will warp the plastic and the two halves won’t fit together!)


I decided to add a ribbon to cover up the glue.  Because of the awkward shape, the glue isn’t quite as pretty as I’d like it- bur ribbon covers it pretty well!

Shake and find your words! It is so fun!


I think we will have a recording sheet that allows our students to collect data on a tally chart to show how many times they see each word. It will look something like this:

Sight Word Data
Put a tally mark for each time you see the sight word.
go
you
into
her
down


 Another variation could be just having them write the word each time they see it.  
I am going to make some with numerals as well!
I also think that colored rice would be super fun with the clear ornaments!
Hope this gives you some fun ideas!!
Sarah